Requirements
- Commander 8.10.1 or later
- A domain administrator credential in the Commander credential library
- A local administrator credential for the deployable images in the Commander credential library
- Advanced property embotics.workflow.script.credentials must be set to true
- Advanced property embotics.rest.credentials.retrievesensitive must be set to true
Configuring the System Properties
This workflow module requires that two Commander System Properties be set.
- Login to Commander as superuser.
- Browse to Configuratiion > System and switch to the Advanced tab.
- Filter the list by "credentials"
- Double click embotics.rest.credentials.retrievesensitive. Set the value to TRUE and click Save.
- Double click embotics.workflow.script.credentials. Set the value to TRUE and click Save.
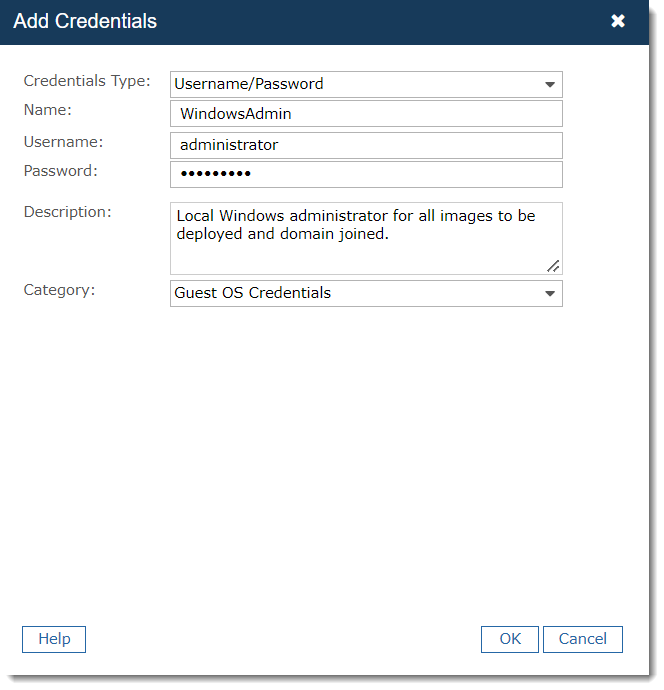
Creating Credentials
This workflow module requires the use of three credentials which you must create in Commander.
- Login to Commander as superuser.
- Browse to Configuratiion > Credentials. Click Add.
- Create the credentials as described in the table below.
| Credentials Type | Name* | Username* | Password* | Description* | Category |
|---|---|---|---|---|---|
| Username/Password | WindowsAdmin | Windows Local Admin username | As set in image for deployable service | Local Windows administrator for all images to be deployed and domain joined. | Guest OS Credentials |
| Username/Password | DomainAdmin | Domain administrator username for the domain to which deployed images will be joined. | As set in the Windows domain. | Domain administrator credentials used to join deployed images to the domain. | Guest OS Credentials |
| Username/Password | CommanderAdmin | Username for a Commander superuser account. | As set in Commander. | Commander superuser account. | Guest OS Credentials |
*Columns marked with an asterisk provide suggestions for values that will be specific to your environment. The values presented here will be used for the rest of the procedures in this article.
Downloading the Solution
The zip package attached to this article contains files will be used in Commander, on the Commander server OS, and on the target image for services which will be joined to the domain after deployment:
| File | Usage |
| Join Domain - WinRM.json | Workflow module in json format that is imported into Commander via the admin console. |
| JoinDomain.ps1 | PowerShell script that is executed by the workflow module. Included for reference. The script contents are embedded within the json file for the workflow module as well. |
| server_config.ps1 | PowerShell script that configures the Commander server OS to use unencrypted connections. This does not expose WinRM on the Commander server OS. The script is used to run WinRM on non-Domain hosts by IP address. |
| template_client_config.ps1 | PowerShell script that configures the client/template image on which the deployed services will be based. Edit this file to harden the firewall rule on line 17 by replacing remoteip=any to remoteip=[Commander server IP address]. |
Preparing the Commander Server
Next, prepare the Commander server to use unencrypted connections to the target images.
- Login as a Windows Administrator and copy server_config.ps1 to the Commander server.
- Launch PowerShell and browse to the location of the server_config.ps1 file.
- Execute the command:
Set-ExecutionPolicy Unrestricted
- Choose Y when prompted to confirm.
- Execute the command:
server_config.ps1
- Choose Y when prompted to confirm.
- Successful output looks similar to the following:
Preparing the Deployable Images
Next, prepare all of the deployable images/templates that need to be domain joined as part of their completion. These steps must be followed for each image upon which a service in the Service Catalog is based.- Login as a Windows Administrator and copy template_client_configuration.ps1 to the image to prepare.
- Launch PowerShell and browse to the location of the template_client_configuration.ps1 file.
- Execute the command:
Set-ExecutionPolicy Unrestricted
- Choose Y when prompted to confirm.
- Execute the command:
template_client_configuration.ps1
- Choose R when prompted to confirm.
- Successful output looks similar to the following:
Importing the Workflow Module
Next, import the workflow module that will be called from your completion workflow.- Login to Commander as superuser.
- Browse to Configuratiion > Self-Service and switch to the Completion tab.
- Switch to the Modules subtab and click Import.
- Click Browse and select the Join Domain - WinRM.json file. Add a description and click Import.
- When the module appears in the table, click Edit to open the Completion Workflow Module Configuration wizard. Click Next.
- Highlight Domain Credential Name and click Edit.
- Update the Default Value to DomainAdmin and click OK.
- Highlight Domain to Join and click Edit.
- Update the Default Value to be the FQDN of the domain to which deployed images will be joined and click OK.
- Highlight Domain to Join and click Edit.
- Update the Default Value to WindowsAdmin and click OK.
- Click Next and on the Steps page edit Execute Join Domain Command setting the Credentials to CommanderAdmin.
- Click Next, add a description of your changes and click Finish.
Configuring the Completion Workflow
Finally, add the module to your completion workflow with a run module step.Add a Wait for Event > Guest OS to Power On step prior to the Run Module step to make sure the deployed machine is ready to be joined to the domain.
When adding the Run Module step, select
Additional Steps
Snow recommend that the Domain GPO be used to disallow unencrypted WinRM on deployed machines once they are joined to the domain. This is the default setting for the policy, so only requires updating if it has previously been configured to allow the unencrypted connections. Was this helpful?


0/255
Upload Attachment
File Upload
Maximum file
size allowed is 3 MB.
Supported file types:
Documents (.txt, .doc, .docx, .pdf), Images (.jpg, .png), Comma Separated Files
(.csv) Speadsheets (.xlsx, .xls)
Are you sure you want to cancel the case creation?
Case closed successfully
File Upload
Maximum file size allowed is 3 MB.
Supported file types:
Documents (.txt, .doc, .docx, .pdf), Images (.jpg, .png), Comma Separated Files
(.csv) Speadsheets (.xlsx, .xls)
Are you sure you want to close this case
| Products | Region | Phone Numbers |
|---|---|---|
| FlexNet Operations FlexNet Embedded FlexNet Publisher FlexNet Connect FlexNet Code Insight InstallAnywhere InstallShield |
North America * |
+1 630-332-2513 (toll) +1 877-279-2853 (toll-free in North America) |
| Europe * |
+44 1925 944367 (toll) +44 800 047 8642 (toll-free in Europe) |
|
| Japan * | +81 3-4540-5335 (select option 2) | |
| Australia * |
+61 3 9895 2177 +61 1800 560 603 (toll-free in Australia) |
|
|
Usage Intelligence (formerly
Revulytics) Compliance Intelligence |
Please use the Case Portal to submit your support ticket or reach out to your Revenera contact. | |
File Upload
Maximum file
size allowed is 3 MB.
Supported file types:
Documents (.txt, .doc, .docx, .pdf), Images (.jpg, .png), Comma Separated Files
(.csv) Speadsheets (.xlsx, .xls)
Revenera Assistant


Case id: 00001065
Activity: Status change: 2 hours ago